HOME IMPROVEMENT
A Complete Checklist for Interstate Removals

Juggling dozens of boxes, scrambling to manage countless details, and feeling the emotional weight of leaving familiar surroundings. That’s the reality for many people planning interstate relocation. It’s not just about packing and loading trucks; it involves planning, timing, and emotional adjustments, often creating a whirlwind of stress and confusion through the relocation process.
This article serves as your guide through the chaos, offering a detailed checklist that streamlines the entire moving process, from the initial packing to chosing a reliable removal service and settling into your new home. It covers every stage, ensuring nothing slips through the cracks, with practical solutions that ease your transition and make your interstate move as smooth as possible.
1. Pre-Move Preparations
Begin your move by selecting a reliable company specialized in interstate removals. Ensure you compare quotes, check reviews, and verify licenses to avoid common pitfalls. This step guarantees that your belongings are in safe hands.
Next, create an inventory list of all items you plan to move. This list helps keep you organized, gives you peace of mind, and also simplifies claims against insurance should anything go awry.
Finally, take time to sort through and declutter your possessions. This not only reduces the load but can also cut down on moving costs. Reducing clutter means fewer boxes to transport, which simplifies your moving day logistics significantly.
2. Legal and Administrative Tasks
Updating your documents is a critical step. You’ll need to address changes to your driver’s license and vehicle registrations. Typically, states require updates within 30 days of establishing residency. Don’t overlook this deadline to avoid legal issues.
In addition, you must inform important parties of your address change. Make a list that includes your employer, your children’s schools, and providers of your regular subscription services.
Timely notifications ensure you continue receiving important mail and services without interruption. It also keeps your records current, which is essential for seamless transitions into new state systems.
3. Packing Strategies
Adopt a systematic approach to packing. Tackle one room at a time, packing similar items together and ensuring fragile items are well secured to reduce the risk of damage. Interstate removalists or local packing services can give insight into the best strategy and what packing materials will best suit your belongings. Clearly label each box with its contents and the room it belongs in. This method not only keeps you organized but also simplifies unpacking at your new home.
It’s equally crucial to prepare an essentials box. This box should include items you’ll need immediately upon arrival, like toiletries, a few dishes, basic tools, and perhaps bed linens.
Having these essentials easily accessible will alleviate stress during your first night in the new home, ensuring you don’t have to rummage through multiple boxes for your necessities.
4. Moving Day Coordination
Ensure you perform a thorough final walkthrough of your old home on moving day. Check every nook and cranny, including behind doors, inside all cabinets, and in attic or basement spaces, to confirm that no valuable items are left behind. This step is crucial to avoid the hassle of retrieving items later or losing them forever. Experienced removalists can always advise on such.
Also, prioritize the safety of your important documents and valuables. Pack these items separately from your other belongings in a well-labeled, easily accessible container. Consider transporting this container in your personal vehicle to keep these essentials secure and within reach.
This approach not only protects these items from potential mishaps during the move but also gives you immediate access to necessary documents for any unforeseen requirements during your relocation. Proper moving day coordination also helps you avoid common moving mistakes.

5. Settling into the New State
Once you arrive in your new home, focus on unpacking the essentials first. This includes items you’ll need immediately such as bedding, kitchen essentials, and personal hygiene products. Setting up these areas quickly will make your first few days smoother and more comfortable. You may want to use an unpacking service to avoid wearing out yourself, given that distance moves might already be hectic.
Engaging with your new community is also vital. Start by exploring local events and joining community groups or clubs that align with your interests. This is a great way to meet neighbors and make connections that can help you feel at home more quickly. Such activities are not only enjoyable but also instrumental in building a new support network in an unfamiliar place.
Conclusion
As you reflect on your upcoming move, consider how integrating this checklist into your planning might change entire process and experience. Each step has been designed to make it a stress-free move and enhance efficiency, tailored to fit diverse moving scenarios.
Think about how your next relocation could be smoother by using this structured approach. Could a more organized move leave you with more time to settle in and less to worry about?
Lastly, set up a personalized moving timeline using this checklist as your foundation. For an even more streamlined experience, consider using a moving app to keep track of tasks and timelines.
After the move, take time to relax and explore your new surroundings or indulge in a spa day to recharge. These steps will not only help in organizing your move but also ensure you start your new chapter on a positive note.
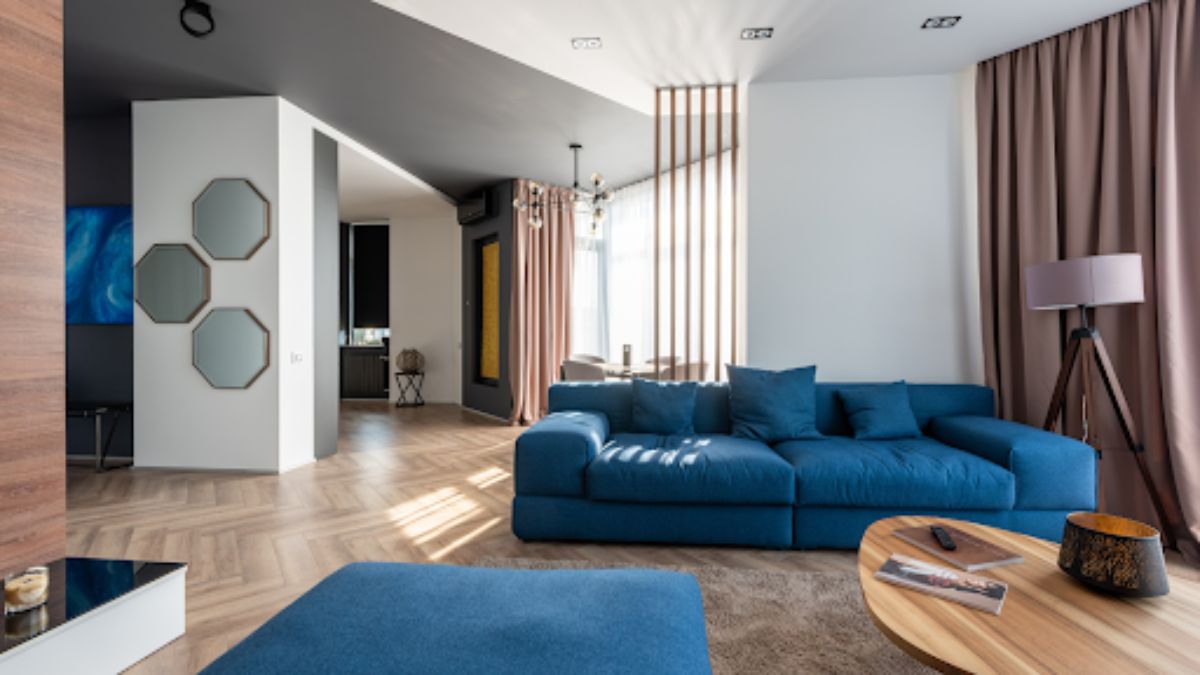
Ever had that moment when you plop down on your sofa after a long day and just… sigh? That’s what a great relaxation zone should feel like. Your living room isn’t just another space in your home—it’s where life happens.
Movie nights, heart-to-hearts, afternoon naps, and sometimes just staring at your phone while pretending to watch TV. Let’s transform that space into something spectacular with the right modern sofas and sectional configurations.
The Psychology of Comfort: Why Your Sofa Matters
Before diving into furniture arrangements, let’s get real about what makes a space truly comfortable. There’s actual science behind why certain rooms make us feel at ease while others leave us tense.
The Science Behind Optimal Relaxation Spaces
Ever wonder why some rooms instantly make you feel relaxed? Research shows that the right balance of texture, lighting, and furniture placement can lower your cortisol levels—the stress hormone that keeps us wired.
How Modern Furniture Design Impacts Wellbeing
Modern furniture design isn’t just about looking sleek, it’s fundamentally about function. The low-profile designs of many modern sofas provide support while encouraging a relaxed posture. The clean lines also reduce visual clutter, which can subconsciously calm your mind.
Now that we understand why our sofa choices matter so much for our wellbeing, let’s explore how different configurations can transform your space.
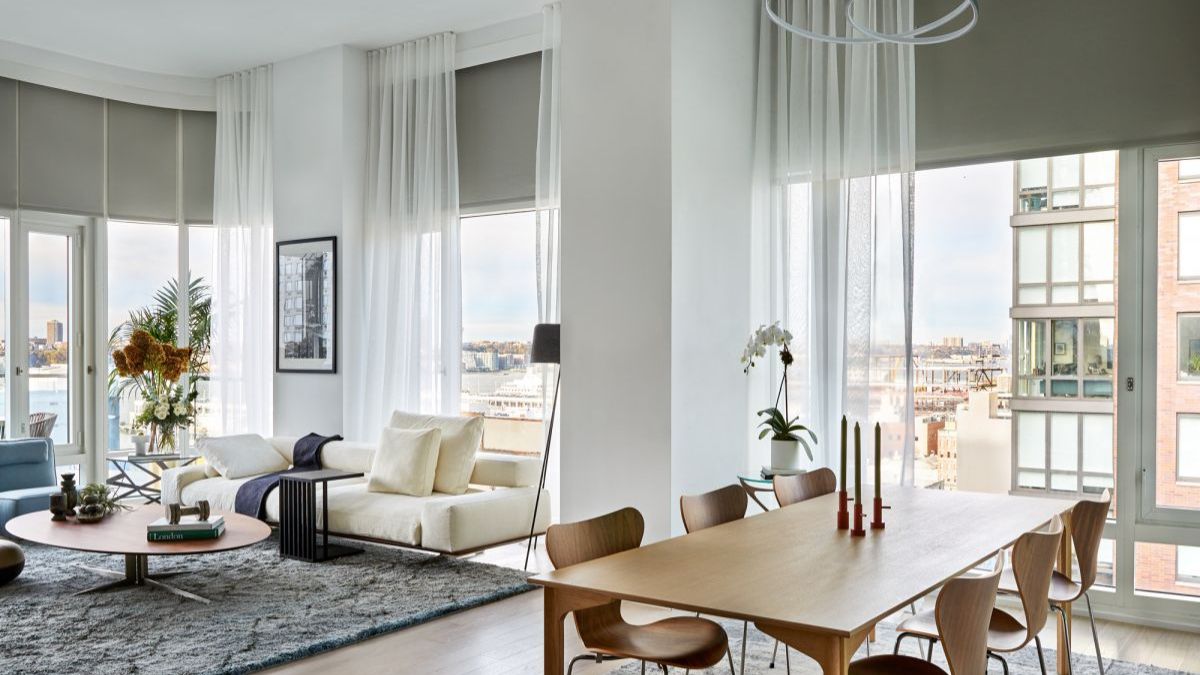
Modern Sectional Configurations for Maximum Comfort
The beauty of modern sectionals lies in their versatility. I’ve spent countless hours helping clients figure out the perfect arrangement, and there’s truly a configuration for every space and lifestyle.
The Versatile L-Shape: Corner Optimization Techniques
L-shaped sectionals are like living room sectional sets, they work in almost any space. For smaller rooms, try placing the sectional with the shorter end against a wall to open up the room. In larger spaces, float it in the center to create distinct zones without walls.
U-Shaped Sectionals: Creating Conversation Pits That Foster Connection
If you’ve got the space (and a social lifestyle), U-shaped sectionals create the ultimate conversation zone. They naturally encourage face-to-face interaction and make everyone feel included in the discussion.
The key here is to ensure there’s enough breathing room around the sectional. Nobody wants to feel trapped in a furniture maze, right?
Sectional Double Chaise Arrangements: Dual Relaxation Zones
For couples or roommates who love to lounge but need their personal space, the sectional double chaise is a game-changer. With lounging areas at both ends, it eliminates the eternal question of “whose turn is it to put their feet up?”
These configurations work well when placed against a wall, but can also float in larger rooms with the back facing a dining or entry area.
Floating Configurations: Breaking Traditional Furniture Placement Rules
Who says your sectional couch needs to hug the wall? Floating your sectional in the middle of the room can completely transform how the space feels and functions. This approach works especially well in open-concept homes where you need to create distinct areas without actual walls.
Understanding the right configuration is just the first step—next, we need to pick the perfect modular couch that fits your specific needs and lifestyle.
Choosing the Perfect Modular Couch for Your Lifestyle
Modular sofas have revolutionized how we think about living room furniture. These versatile pieces allow you to reconfigure, expand, or adapt as your needs change.
Assessment of Your Space: Measuring for the Ideal Fit
Before you fall in love with any sectional, get out that measuring tape! Nothing’s worse than delivery day discovering your perfect sofa won’t fit through the door (trust me, I’ve been there).
Measure not just the wall space but also consider traffic flow—you’ll want at least 30 inches for walkways around your sectional. And don’t forget to account for any unusual architectural features like columns or low windows.
Modular Systems That Grow With Your Needs
The beauty of modern modular systems is their adaptability. Starting with a basic configuration and adding pieces as your space or family grows makes modular couches a smart investment. Many can transform from an L-shape to a U-shape with just a few additional pieces.
Material Selection Guide: Performance Fabrics vs. Leather
Here’s my hot take: with modern performance fabrics, you don’t have to choose between beauty and practicality anymore.
Performance fabrics have come a long way—many can withstand spills, pet hair, and even crayon marks while still feeling luxurious. Leather offers timeless appeal and develops a gorgeous patina over time, but requires more maintenance and can be less forgiving with kids and pets.
Smart Technology Integration in Modern Sectionals
Today’s modern sofas often come with built-in USB ports, wireless charging, and even app-controlled recliners. While these features aren’t necessary, they can definitely elevate your relaxation game—especially if you’re someone who’s always looking for a place to charge your phone!
With the perfect sectional selected, it’s time to layer in additional elements that take comfort to the next level.
Layering Elements for Ultimate Comfort
A great sectional is just the foundation—the magic happens in the layers you add.
Strategic Pillow Arrangements for Back Support and Aesthetics
Pillows aren’t just decorative—they provide crucial support for different sitting positions. I always recommend a mix of firm pillows for back support and softer ones for cuddling up.
For a designer look without the fuss, follow the odd-number rule: arrangements of 3, 5, or 7 pillows tend to look more natural than even numbers. And don’t be afraid to mix patterns within a coordinated color scheme!
Throw Blankets: Functional Decoration for Warmth and Style
Draping a couple of textured throws over your sectional instantly adds warmth—both visually and literally. I like layering different textures like chunky knits with smoother weaves for visual interest.
The casual drape over an armrest or folded neatly on the back of the sofa both work—just make sure they’re comfortable to use!
Personalizing Your Modern Sofa Space
At the end of the day, the most comfortable spaces are the ones that feel uniquely yours.
Art and Accessory Placement Around Large Sectionals
Large sectionals create wonderful opportunities for statement art pieces. A good rule of thumb: the art above your sofa should be about two-thirds the width of the sofa below it.
For accessories, think beyond the standard coffee table books. Personal mementos, unique sculptures, or even a beautiful chess set can make the space feel distinctly yours while still maintaining that modern aesthetic.
FAQs
What is the 2/3 rule for sofas?
The golden ratio rule essentially says that your living room furniture arrangement should follow a 2:3 ratio. This means that between your couches, chairs, area rugs, and coffee tables, proportions should generally be a two-thirds proportion.
How to make a sofa more cozy?
Drape your sofa with plush blankets and add an abundance of cozy pillows in various textures like velvet, faux fur, or knit. Consider a soft, shaggy rug to add warmth underfoot. A comfortable armchair or a cozy reading nook with a bean bag or floor cushions can create inviting spaces.
How to break in a new couch fast?
Sit and lay on your sofa as much as possible throughout the day to squish the cushions under your weight. Bounce up and down a few times to compress the cushions and break down the foam insert a little. Shuffle the cushions around and flip them periodically so they soften evenly.
Conclusion
Creating the ultimate relaxation zone isn’t just about buying furniture—it’s about designing a space that reflects who you are and how you live. Whether you opt for a sleek sectional double chaise, a sprawling U-shaped conversation pit, or a versatile modular couch, the right configuration can transform your living room into a sanctuary.
Remember that comfort is personal. Some people love to sink into cloud-like cushions, while others need firmer support. Your perfect relaxation zone should cater to your specific definition of comfort while still looking amazing.
So grab that measuring tape, think about how you use your space, and start planning your dream relaxation zone. Your future self—probably horizontal on that perfect sectional with a good book or Netflix binge—will thank you!
Spaces are designed to inspire emotions alongside sight, where elegance and grandeur coexist. Putting your personal style into function without sacrificing style is the essence of redefining home design. In keeping with this approach, Blog LuxuryInteriors.org gathers content that will enlighten and inspire those who are eager to discover new interior design frontiers.
By first describing the essential elements and then offering practical tips and ideas, this guide will help you reimagine interior design regardless of your degree of expertise or the kind of space you possess.
Why Redefining Interior Design Matters
What we call “interior design” goes much beyond just arranging furniture and paint in a room. It’s a way to express oneself creatively, make a statement, and give any space personality. A home’s aesthetic value and the quality of life of its inhabitants are both enhanced by well-executed renovations. If interior design is going to be redone, the emphasis needs to change from a cookie-cutter method to one that is intentional, chosen, and creative.
Key aspects of modern interior design include:
- Balancing aesthetics with function: Locations have to be both aesthetically pleasing and practically sound.
- Sustainability: Efforts towards sustainability should promote environmental friendliness and ethical resource procurement.
- Innovative technology: Stylish and user-friendly smart home systems are a product of modern invention.
- Customization: modifying characteristics to match the unique needs and preferences of those utilising them.
Defining the Elements of Luxury Design
1. Materials Matter
Using high-quality materials should be your first priority while building a luxury house. Envision surfaces adorned with exquisitely crafted metal or glass, exquisitely woven fabrics, exquisitely grained woods, and genuine stone. Sincerity goes a long way, and good things have a beautiful patina that they acquire with time.
Pro Tip:
Some timeless materials that complement both contemporary and traditional design are marble, velvet, or brushed metal.
2. Mastering Lighting
An improvement in illumination is profound. Ambient, task, and accent lighting all work together to set the mood and tone of a room. A dimmable chandelier in the dining area exudes refinement, while state-of-the-art acoustic lighting in the workplace promotes relaxation and efficiency.
3. Sustainability as a Pillar
Reimagining sustainable design is central to modern interior design. Opt for recycled metals or wood, two examples of eco-friendly materials, and support businesses that prioritise ethical sourcing.
Example:
Looking for additional ways to be eco-friendly while living it up in style? Check out articles like “How Proper Waste Removal Enhances Luxury Home Interiors” on Blog LuxuryInteriors.org.
4. Attention to Detail
An accumulation of small things leads to opulence. From the elaborate mouldings and cabinets to the one-of-a-kind carpeting and hidden storage spaces, everything ought to have a function. The smallest, most inconspicuous aspects of a product or service are often the most telling of its quality.
5. Technology-Integrated Spaces
There will be no going back on intelligent house design. Smart home automation may update your space while making your life easier by controlling your lighting, temperature, blinds, and entertainment systems. These technological advancements should complement, rather than detract from, the visual appeal of your space.
Global Inspirations for Redefining Interiors
Exquisite interior design is subjective. Use inspiration from all across the globe to give your house a one-of-a-kind look.
- Dubai’s Architectural Brilliance (The inspiration for this came from the article “Exploring the Elegance of Dubai’s Luxury Homes and Architectural Brilliance.”)
Middle Eastern modernism has a well-deserved reputation. Expensive estates with state-of-the-art technology and beautifully designed interiors reimagine what it means to live lavishly.
- Scandinavian Minimalism
A hygge setting is one that makes use of natural light, is uncluttered, and promotes cosiness. Envision relaxing spaces that are thoughtfully furnished with only the essentials, with clean lines and an eye towards practicality.
- Industrial Meets Luxe
New York and other major cities are leading the way in a new kind of industrial design that incorporates upholstered furniture and metals that have been mirror polished.
Pro Tip:
Keep in mind the homeowner’s regional influence constantly. Mediterranean arches or Victorian-era soft furnishings are two examples of the kind of one-of-a-kind local touches that may transform a room.
How to Start Redefining Your Own Space
Step 1: Assess Your Current Space
Kindly inspect the area and inform me of any damage that need fixing. Evaluate the overall lighting, functionality, and traffic flow of the rooms. You may refine your ideas with the help of vision boards.
Step 2: Build a Color Palette
A lot of high-end interior design projects begin with a stylised colour palette. Lay a neutral tone like cream, light grey, or charcoal as your base, and then spruce up the look with a jewel tone or metallic accent.
Step 3: Create Layers
Stacking pieces of furniture with different materials, patterns, and styles gives your room a more three-dimensional look. A velvet sofa, a stylish leather armchair, and patterned throw pillows provide depth without becoming overpowering.
Step 4: Invest in Originality
Opt for one-of-a-kind pieces of art or special-order furniture. The essence of luxury is in its uniqueness, not in its categorisation.
Why Choose Blog LuxuryInteriors.org as Your Design Guide
Our delight at Blog LuxuryInteriors.org is in providing carefully curated advice, helpful suggestions, and access to the best design concepts from across the world. Our website goes beyond simply displaying beautiful home ideas by offering practical guidance that helps you save time and achieve better results.
We offer tips to help you at every step, whether you’re renovating a single room or constructing a whole new home.
Highlighted Resources on Our Site:
- Elevate Your Luxurious Interiors with Style: Discover your centre and become an expert at personalisation.
- Suggestions for Making Your House Look More Deco: Methods to cut costs without compromising on fashion.
- Incorporating Modern Concepts from the Outside: Just as important is outdoor opulence.
A Final Word on Transforming Design
Your home’s decor will likely evolve alongside you. Aim high in the start, but make sure everything is to your liking and meets your requirements. Redesigning your environment may be a rewarding experience when you see how it enhances your quality of life, even if it could be scary at first.
Indulge in the world of interior design fantasies, unearth priceless artefacts, and uncover one-of-a-kind ideas at Blog LuxuryInteriors.org.

The Need for Planning in Home Design
Home design goes beyond selecting paint colors or the perfect sofa—it begins long before there are even any interior design decisions to be made. Any successful DIY home renovation or new home construction project starts with a well-designed floor plan. Whether you’re re-designing the kitchen, adding an addition, or designing your dream small home, what you plan in advance will dictate how gracefully the space will flow, function, and help with your daily tasks.
But too many do-it-yourself designers plunge into renovations without considering how the layout facilitates daily living. A floor plan is not a drawing—it’s the blueprint of the project. And you don’t have to have a degree to draw one. With the right mindset and strategy, you can hire a floor plan designer to draft a space that’s not only gorgeous but extremely functional.
Begin with Your Needs, Not Your Wishlist
One of the most common DIY design errors is beginning with aesthetics. It’s just so tempting to jump into mood boards and inspirational images, yet sometimes function must precede aesthetics. Stop before you lay your hands on any design program or sketchbook and consider your use of the space. Do you need more storage, more light, or shorter distances between spaces? Are you designing for children, elderly parents, or home office needs?
A functional floor plan is lifestyle dictated. If you cook frequently, your kitchen area needs to be designed to foster efficiency among the refrigerator, stove, and sink—the work triangle. If you entertain frequently, consider open-plan designs linking cooking, dining, and living areas. Each design decision must respond to the way you live, not the way you believe you live.
Get Your Measurements Right
Accurate measurements are the foundation of a great layout. Most DIYers work off of estimates, only to find that the furniture they love will not fit or that a wall move they envisioned will not function. You need to have your space mapped out before you begin sketching or using a floor plan software.
Measure all walls, windows, doors, ceiling heights, and even the width of architectural details such as beams or radiators. Record the locations of electrical outlets and plumbing fixtures. That way, you can design from your actual space rather than designing in a vacuum. Errors now will be expensive to correct later, particularly if construction has commenced.
Learn the Language of Space and Flow
It’s simple to fall in love with square footage, but a house’s flow—how folks move around it—is equally important. A good floor plan encourages natural movement and reduces congestion. Consider how the rooms relate to each other. Is the bathroom too far from the bedroom? Does the front door open into a cluttered hall?
One of the sleights of architects is to design in zones: public (dining room, living room), private (bedrooms), and service (kitchen, bathroom, laundry). Clustering these zones together sensibly may be able to create even a tiny house to be larger and more functional. Circulation paths—the routes that people take in moving from one room to the next—must be short, direct, and unobstructed.
Use a Digital Tools to Visualize your Options
Once you have your measurements and goals in mind, you can move to the digital phase. A quality floor plan creator will allow you to experiment with multiple layouts, spin pieces of furniture, and estimate the impact of moving walls or adding windows. What was once a tedious drafting process can now be achieved from your laptop with fairly simple tools.
But keep in mind: the tool is only as good as what you put into it. Don’t use it to make things look neat—use it to test how spaces interact with one another. Experiment with multiple versions of your plan and look at them from different angles. How does the lighting change over the course of a day? Is your arrangement going to function in five years’ time as your needs evolve?
Think in Dimensions Higher Than the Floor
A floor plan is, by definition, two-dimensional, yet good design occurs in three dimensions. Think about ceiling heights, vertical storage, and visual sight lines. For instance, if you have an open kitchen-living space, consider how much of your kitchen mess you can see from the couch. Or how a low ceiling can make a narrow hallway feel tight.
You can even utilize your vertical space effectively. Tall bookshelves, mezzanines, or creative lighting fixtures can all contribute to the impression of volume. A floor plan that has been thought out well includes height as much as width and length.
Expect Infrastructure and Latent Constraints
When planning your layout, it’s easy to dream up anything is possible—but several structural and legal restrictions can’t be overlooked. Some walls are load-bearing. Windows can’t always be accommodated in some spaces because of zoning regulations. Plumbing can only be relocated so far without extensive reconstruction.
This isn’t a call for you to entirely abandon your ideas, but that you become aware of potential pitfalls early. A bit of research into your building’s construction or town rules can prevent expensive changes down the line. If unsure, seek advice from a structural engineer or builder, especially before removing walls or installing extensions.
Test Your Design in Real Life
Do a floor plan test before you finalize a layout. Set out your design on the floor with masking tape or chalk. Walk through the room as if walls and furniture were there. Open and close imaginary doors. Attempt to move from bedroom to bathroom in the dark. Sit in your reading nook and imagine how the light will hit you.
This kind of spatial rehearsal catches onto awkward placements or tight spots that don’t look so apparent on paper. It also emotionally binds you to your space—converting it from a theoretical plan to a livable experience.
Design with Flexibility in Mind
Your life will change—and your space needs to be able to change with you. Try to build flexibility into your design. That extra bedroom might one day be a nursery, a guest room, or a home office. A large dining table can be used as an office area. Movable partitions and modular furniture allow you to change your space without major adjustments.
The best DIY floor plans are those that don’t lock you into one use. Plan for the present and future. Even small things like keeping additional outlets open, adding sliding doors, or using non-permanent walls can keep your options open.
Conclusion: Good Design Is Strategic, Not Just Creative
Creating your own floor plan isn’t a drawing exercise—it’s a strategic move. It requires understanding how space works, thinking about real habits, experimenting with ideas, and envisioning the future. Slowing down to measure, making flow the top priority, experimenting with your design both on computer and in reality, you’re not only building a room—you’re building how you live.
Using a floor plan creator effectively can be the bridge between your fantasy and reality. With proper planning and a pragmatic approach, you can master the foundation of any home design project—your plan.
-

 TOPIC5 months ago
7 Expert Tips For Choosing The Best Basement Renovation Companies
-

 BUSINESS1 week ago
Top 5 Features of Sowix Online That Every User Should Know About
-

 TOPIC2 weeks ago
Greece Katz Martian: A Cultural Exploration of an Intriguing Figure
-

 TOPIC1 month ago
Top Features of BetterThisWorld .com You Need to Know About
-

 FINANCE2 months ago
How TraceLoans Can Simplify Your Finances
-

 BIOGRAPHY2 months ago
From Reality Star to Business Mogul: Prince Narula Digital PayPal
-

 TOPIC3 months ago
Exploring Sifangds: The Hidden Gem of Modern Design
-

 TOPIC2 weeks ago
Kashito_Toto Explained: What You Should Know in 2024