TOPIC
Relazaurus: Transforming Your Space into a Haven of Calm

Welcome to the world of Relazaurus—a sanctuary for your senses and a guide to creating your personal oasis at home. In today’s fast-paced environment, finding moments of tranquility can feel like an uphill battle. But what if you could transform your living space into a serene haven? Imagine coming home after a long day and stepping into a comforting atmosphere that soothes your mind and soul. Whether it’s through mindful design or incorporating elements from nature, the principles behind Relazaurus are all about fostering relaxation in every corner of your home. Let’s embark on this journey together, exploring how you can cultivate peace right where you live!
The Science behind Creating a Calming Space
Creating a calming space is rooted in psychology and environmental design. Our surroundings impact our mood and stress levels. Colors, textures, and layouts play significant roles.
Soft colors like blues and greens can promote relaxation. These shades mimic nature, helping to reduce anxiety. Conversely, harsh colors may evoke tension or discomfort.
Lighting also matters deeply. Natural light boosts serotonin levels, enhancing well-being. Soft lighting options create warmth without overwhelming the senses.
Sound contributes too; gentle music or nature sounds invite tranquility into your environment. Silence can be just as powerful for fostering calmness.
Incorporating personal elements fosters emotional connections with your space. Familiar art pieces or sentimental objects can ground us in moments of stress.
All these factors combined create an oasis that nurtures peace within ourselves amidst life’s chaos.
Tips for Designing Your Home with Relaxation in Mind
Creating a relaxing home starts with color choice. Soft, neutral tones can evoke calmness. Think gentle blues and muted greens to promote tranquility.
Lighting is equally important. Opt for soft, warm lighting instead of harsh fluorescents. Consider using dimmers or lamps that allow you to control the ambiance.
Furniture placement should encourage ease of movement. Arrange pieces in a way that invites conversation yet provides personal space.
Textures add depth to your environment. Incorporate plush cushions and throws for warmth. This tactile comfort enhances relaxation instantly.
Create designated zones in your home for different activities—reading nooks, meditation corners, or cozy lounges—to separate daily chaos from peaceful moments. Each area can serve as an escape from everyday stresses while enhancing your overall well-being.
Incorporating Nature into Your Space
Bringing nature indoors can transform your space into a tranquil refuge. Start with houseplants; they purify the air and add a refreshing touch. Consider easy-to-care-for varieties like snake plants or pothos, which thrive in various light conditions.
Natural light is another vital element. Maximize windows and let sunlight flood your rooms. This not only brightens up the environment but also uplifts your mood.
Textures play an essential role too. Incorporate materials like wood, stone, or bamboo in furniture or decor for an earthy feel that evokes the outdoors.
If you’re short on space, think vertically—hanging planters can create stunning visual interest without occupying precious surface area.
Artwork featuring landscapes or nature scenes can evoke serenity as well, bringing the essence of the outside world right into your home. Each piece contributes to a calming atmosphere that nurtures relaxation and peace.
Decluttering and Organization for a Peaceful Environment
A cluttered space can lead to a cluttered mind. It’s essential to create an environment that promotes peace and relaxation. Start by assessing your belongings. Identify items that no longer serve a purpose or bring you joy.
Once you’ve sorted through the chaos, consider organizing what remains. Use storage solutions that fit your style—baskets, bins, or shelves can transform how you view your space. Labeling helps maintain order and makes it easy to find what you need without stress.
Incorporate routines for regular decluttering sessions. A few minutes each week can keep disorder from creeping back in. Remember, every item should have its designated spot.
A well-organized home allows for mental clarity and tranquility. Embrace minimalism where possible; it invites simplicity and enhances the calming atmosphere you seek with Relazaurus principles at play.
Adding Elements of Comfort and Coziness
Creating a cozy atmosphere is all about the little details. Soft textiles can make a world of difference. Think plush throws and fluffy cushions that invite you to unwind.
Lighting plays a crucial role too. Warm, gentle lights create an intimate setting. Consider adding candles or string lights for that magical touch in the evening.
Personal touches add warmth as well. Display cherished photos or artwork that resonates with you. These elements tell your story and enhance your space’s comfort level.
Don’t overlook scents; they play an essential part in relaxation. Scented candles or essential oil diffusers can fill your home with calming aromas like lavender or vanilla, promoting serenity.
Arrange furniture to foster conversation and connection. A welcoming layout encourages gathering, turning any room into a comforting retreat where memories are made and moments cherished.
The Benefits of a Relaxing Home Environment
A relaxing home environment acts as a sanctuary for your mind and body. It reduces stress, allowing you to unwind after a long day. This calm space encourages mental clarity and creativity, helping ideas flow freely.
Moreover, a serene atmosphere promotes better sleep quality. The right ambiance can help regulate your circadian rhythm, leading to more restorative rest.
Physical health also benefits from relaxation at home. Lower stress levels can improve cardiovascular health and strengthen the immune system.
Additionally, creating a peaceful environment fosters connection with loved ones. Shared moments in calming settings enhance relationships through meaningful interactions.
When surrounded by tranquility, you’re more inclined to practice self-care routines. Whether it’s reading or meditating, these habits contribute significantly to overall well-being and happiness.
Conclusion: Make Relazaurus Your Go-To Guide for Creating Inner Peace at Home
Creating a serene environment at home can significantly impact your well-being. Relazaurus serves as an essential guide to help you cultivate inner peace in your living space. By incorporating calming elements, embracing nature, and ensuring organization, you create a sanctuary that nurtures relaxation.
Discover the benefits of dedicating time to design a peaceful home. Whether it’s through soft textures or mindful decluttering, every detail counts in crafting an oasis away from daily stressors. Embrace the journey towards tranquility with Relazaurus as your trusted companion for transforming your surroundings into a haven of calm.

Introduction to Laaster and Its Uses
Laaster is more than just a substance; it’s a testament to human ingenuity and artistry. This versatile material has been shaping structures, art, and even culture for centuries. From the grand cathedrals of Europe to contemporary homes, laaster’s unique properties make it an essential component in construction and decoration alike. But what exactly is laaster? How did it become such a fundamental part of our architectural heritage? Join us as we explore its fascinating journey through time, uncovering how this remarkable material has evolved while continuing to inspire creativity and innovation across generations. Dive into the world of laaster—a blend of history, technique, and endless possibilities!
The Origins of Laaster in Ancient Civilizations
Laaster’s roots can be traced back to ancient civilizations. Early artisans recognized the need for durable materials in construction and art. This led them to develop primitive forms of laaster using locally available resources.
In Mesopotamia, clay mixed with natural fibers became a popular choice. These mixtures created sturdy structures that stood the test of time. The Egyptians also embraced laaster, blending gypsum and water to create plaster used in their iconic monuments.
The Greeks advanced these techniques further by introducing lime-based products, enhancing both durability and aesthetic appeal. Their masterpieces often featured intricate designs made possible through refined laaster applications.
Across cultures, this versatile material played a pivotal role in architecture and artistry. It served not only functional needs but also showcased the creativity of those who shaped it into various forms.
Evolution of Laaster Techniques and Materials
The evolution of laaster techniques has been remarkable throughout history. Initially used in ancient structures, artisans relied on simple, natural materials. Clay and gypsum were the primary components, easily accessible for early builders.
As civilizations advanced, so did their methods. The introduction of lime made laaster more durable. Craftspeople began experimenting with additives to enhance strength and workability. This innovation significantly improved architectural resilience.
During the Middle Ages, laaster saw a revival as ornate designs became popular. Decorative plasterwork adorned cathedrals and palaces across Europe. Techniques like stucco emerged during this period, allowing for intricate details that captivated many.
In modern times, synthetic materials have transformed the landscape of laaster application. Innovations such as acrylic-based products offer versatility while maintaining aesthetic appeal. Today’s craftsmen blend traditional skills with contemporary technology to push boundaries further than ever before.
Famous Historical Examples of Laaster
Throughout history, laaster has played a crucial role in various cultures. One of the most notable examples is found in ancient Egypt, where artisans used it to create stunning decorative finishes on tomb walls. These intricate designs were not only beautiful but also served spiritual purposes.
The Renaissance period saw a resurgence of laaster techniques in Europe. Artists like Michelangelo employed it to enhance sculptures and frescoes, adding depth and texture that captivated viewers for centuries.
In Asia, particularly in India, laaster was often mixed with vibrant pigments to produce exquisite wall paintings known as frescoes. The use of local materials resulted in unique textures that celebrated regional artistry.
Many historical buildings still showcase the mastery of laaster craftsmanship. Churches and cathedrals from different eras highlight its enduring appeal across time and geography. Each application tells a story steeped in tradition and creativity.
Modern Day Applications of Laaster
Laaster has found a remarkable place in contemporary society. Its versatility allows for application across various industries, from construction to arts and crafts.
In architecture, laaster is used as a finishing material that provides both aesthetic appeal and durability. Builders appreciate its ability to create intricate designs while ensuring structural integrity.
The art community also embraces laaster. Sculptors incorporate it into their works, crafting stunning pieces that showcase fine details. The medium’s adaptability opens the door for creativity without limits.
Moreover, laaster plays a role in sustainable practices. Eco-friendly formulations are emerging, allowing artists and builders to reduce their environmental impact while maintaining quality.
Health and wellness have not been left behind either; therapeutic uses of laaster can be seen in spa treatments where it’s applied on skin to enhance relaxation and rejuvenation experiences.
Controversies Surrounding Laaster Usage
Laaster, while celebrated for its versatility and aesthetic appeal, has not been without controversy. Critics argue that certain Laaster products may contain harmful chemicals. These substances can pose health risks to artisans and consumers alike.
Another contentious point is the environmental impact of Laaster production. The extraction of raw materials often leads to habitat destruction and increased carbon footprints. As sustainability becomes a priority globally, this aspect of Laaster usage draws scrutiny from eco-conscious individuals.
Cultural appropriation also surfaces in discussions about Laaster art forms. When traditional techniques are commercialized without proper acknowledgment or respect for their origins, it raises ethical questions within artistic communities.
Additionally, debates around authenticity arise frequently. With modern technology enabling mass production, distinguishing genuine handmade pieces from machine-crafted imitations can be challenging for buyers seeking true artistry in Laaster creations.
Future Possibilities for the Advancement of Laaster Technology
The future of laaster technology is brimming with potential. Innovations in materials science could lead to stronger, lighter formulations that enhance durability and versatility.
Imagine a laaster that not only bonds but also adapts to environmental changes, offering greater resilience against moisture and temperature fluctuations.
Additionally, the integration of smart technology holds promise. Sensors embedded within laaster can monitor structural integrity over time. This would be invaluable for buildings and art installations alike.
Sustainability is another frontier worth exploring. Bio-based laasters made from renewable resources could significantly reduce carbon footprints while maintaining performance standards.
Collaboration between artists and engineers may also spark groundbreaking designs, pushing the boundaries of traditional applications into realms we haven’t yet imagined.
These advancements could redefine how we view this age-old material, transforming it into something far beyond its historical roots.
Conclusion: The Timeless Artistry and Utility of Laaster
Laaster has journeyed through the annals of history, showcasing its remarkable adaptability and significance across various cultures. From ancient civilizations that harnessed its properties for artistic expression to modern innovations enhancing its application in construction and design, laaster has proven itself as an invaluable resource.
The evolution of techniques and materials reflects not just technological advancements but also shifts in aesthetic preferences and functionality demands. Famous historical examples remind us of laaster’s rich heritage, while contemporary uses exemplify how it continues to shape our environments.
Despite some controversies regarding safety and environmental impact, ongoing research promises exciting developments on the horizon. As we look ahead, the future of laaster seems bright with potential breakthroughs that could redefine its role even further.
With a legacy steeped in artistry and practicality, laaster remains a testament to human creativity. Its timeless qualities ensure it will continue to influence both art forms and everyday applications for generations to come. The story of laaster is one still being written—a narrative blending tradition with innovation.
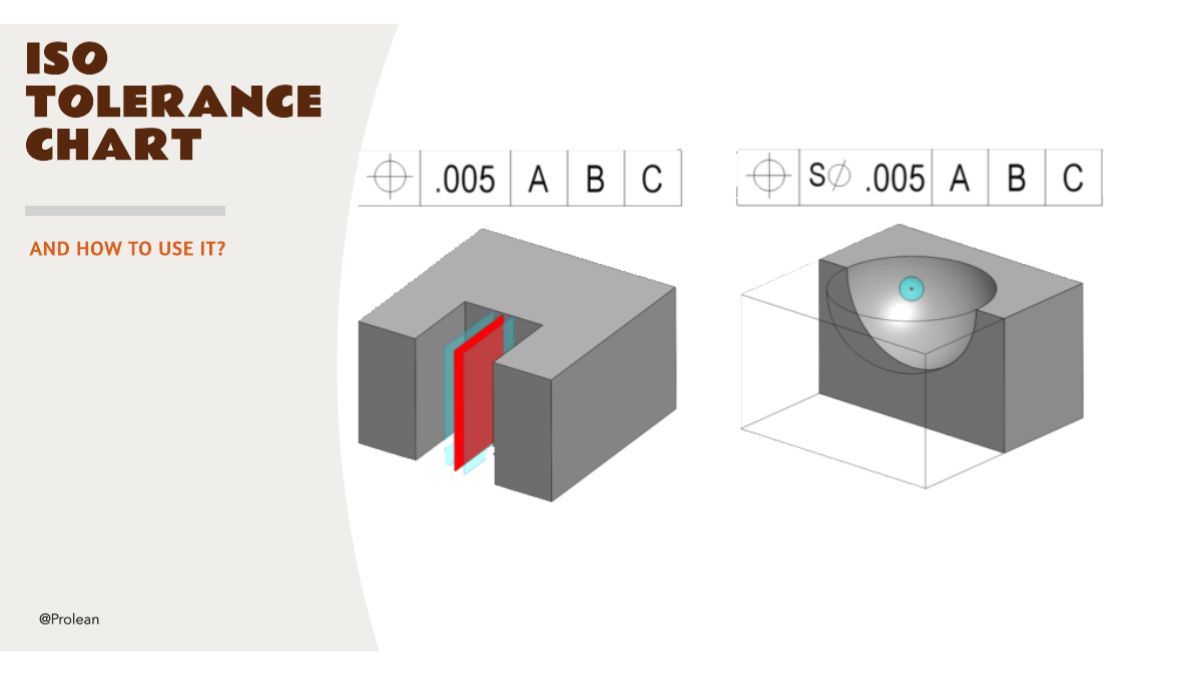
“Tolerance” is a term in manufacturing that defines accuracy and precision control, the allowable dimensional deviation for any mechanical part or system. For uniformity and efficient quality control, engineers and manufacturers use the ISO Tolerance Chart for this. It is ISO ISO-standardized chart illustrating linear, angular, form, and positioning tolerances for various geometrical features(shaft, holes, fits, etc).
ISO tolerance chart is an essential tool to decide whether manufactured parts are up to the desired specifications and standards or not. We will discuss the use of the ISO tolerance chart, its components, and its significance in manufacturing quality control.
Read More: Sheet Metal Tolerances
Iso Standard Tolerance Chart- 2768
ISO 2768 tolerance is the worldwide used tolerance for linear and angular tolerances, widely applicable in CNC machining tolerances. Designers include ISO 2768 tolerance guidelines in their designs, whereas manufacturers understand and machine the designs to meet specified standard tolerances. This way, consistency can be maintained in the production.
Tolerance class is another factor you need to understand before moving on to chart components; Linear and angular tolerance are presented as fine, coarse, medium, and very-coarse tolerances, whereas positioning tolerances involve H, K, and L classes to define the tolerance levels.
“ The ISO Tolerance chart-2768 involves metric tolerances for geometrical and positioning dimensions; nominal length in the rows and crossbanding tolerances in the column.”
Furthermore, there are two categories of ISO 2768 standards for tolerancing; ISO 2768- 1 and ISO 2768-2.
ISO 2768-1
ISO standard chart 2768- 1 deals with the general tolerances for linear and angular dimensions. It outlines the tolerances for length, angles, external radius, and chamfer heights. Meanwhile, the tolerances are divided into fine, coarse, medium, and very coarse.
The typical ISO tolerance table/chart of 2768-1 is given below;
| Type | Nominal Length Range (mm and º) | f (Fine) | m (Medium) | c (Coarse) | v (Very Coarse) |
| Linear Dimensions | 0.5 up to 3 | ±0.05 | ±0.1 | ±0.2 | – |
| Over 3 up to 6 | ±0.05 | ±0.1 | ±0.3 | ±0.5 | |
| Over 6 up to 30 | ±0.1 | ±0.2 | ±0.5 | ±1.0 | |
| Over 30 up to 120 | ±0.15 | ±0.3 | ±0.8 | ±1.5 | |
| Over 120 up to 400 | ±0.2 | ±0.5 | ±1.2 | ±2.5 | |
| Over 400 up to 1000 | ±0.3 | ±0.8 | ±2.0 | ±4.0 | |
| Over 1000 up to 2000 | ±0.5 | ±1.2 | ±3.0 | ±6.0 | |
| Over 2000 up to 4000 | – | ±2.0 | ±4.0 | ±8.0 | |
| External Radius & Chamfer Heights | 0.5 up to 3 | ±0.2 | ±0.2 | ±0.4 | ±0.4 |
| Over 3 up to 6 | ±0.5 | ±0.5 | ±1.0 | ±1.0 | |
| Over 6 | ±1.0 | ±1.0 | ±2.0 | ±2.0 | |
| Angular Dimensions | Up to 10º | ±1º | ±1º | ±1º30′ | ±3º |
| Over 10 up to 50º | ±0º30′ | ±0º30′ | ±1º | ±2º | |
| Over 50 up to 120º | ±0º20′ | ±0º20′ | ±0º30′ | ±1º | |
| Over 120 up to 400º | ±0º10′ | ±0º10′ | ±0º15′ | ±0º30′ | |
| Over 400º | ±0º5′ | ±0º5′ | ±0º10′ | ±0º20′ |
ISO 2768-2
ISO 276-2 involves positioning tolerance of geometrical features, like symmetry, flatness, perpendicularity, and run out. It also provides tolerances under three classes, H, K, and L. Furthermore, it also provides tolerances over nominal length.
Here is a typical example of an ISO tolerance chart under the 2786-2 standard;
| Type | Nominal Length Range (mm) | H | K | L |
|---|---|---|---|---|
| Flatness | Up to 10 | 0.02 | 0.05 | 0.1 |
| Over 10 up to 30 | 0.05 | 0.1 | 0.2 | |
| Over 30 up to 100 | 0.1 | 0.2 | 0.4 | |
| Over 100 up to 300 | 0.2 | 0.4 | 0.8 | |
| Over 300 up to 1000 | 0.3 | 0.6 | 1.2 | |
| Over 1000 up to 3000 | 0.4 | 0.8 | 1.6 | |
| Perpendicularity | Up to 100 | 0.2 | 0.4 | 0.6 |
| Over 100 up to 300 | 0.3 | 0.6 | 1 | |
| Over 300 up to 1000 | 0.4 | 0.8 | 1.5 | |
| Over 1000 up to 3000 | 0.5 | 0.8 | 2 | |
| Symmetry | Up to 100 | 0.5 | 0.6 | 0.6 |
| Over 100 up to 300 | 0.5 | 0.6 | 1 | |
| Over 300 up to 1000 | 0.5 | 0.8 | 1.5 | |
| Over 1000 up to 3000 | 0.5 | 1 | 2 | |
|
Run-Out |
All ranges |
0.1 | 0.2 | 0.5 |
How to Use the ISO Tolerance Chart?
Adapting ISO standards in GD&T of designs and the machining process needs a tolerance chart. Additionally, it is equally important to know how to use the available tolerance chart. The steps below briefly elaborates the steps how you can use the chart in your project;
- Identify the Chart Components: Familiarize yourself with the chart format and available information. Additionally, identify the nominal size of the part as all tolerances are given for specific nominal sizes.
- Choose the Tolerance Grade: Next, decide which tolerance grades you want to use, the values are given in the column with the grade symbols.
- Find Vales on the Chart: Now locate the tolerance values on the chart corresponding to your nominal dimensions. Then apply the information whether you are creating the designs or machining the designs with ISO tolerancing.
Significances of ISO Tolerance Chart in Manufacturing

CNC machine part
The ISO tolerances are not only the basis for manufacturing measurements but also important for ensuring the functionality and performance of manufactured items. Additionally, it is also a big deal for the manufacturability of designs.
The standard ISO tolerances provide uniformity in manufacturing worldwide and offer interchangeability. Subsequently, It also maintains the desired dimensional accuracy in production; reducing the number of defective items.
Therefore, it is recommended to choose a manufacturer that has experience working with ISO tolerancing companies like ProleanTech.

Setting up a workshop – whether it’s in your garage, basement, or a dedicated outbuilding – almost always starts with picking out a solid workbench. This isn’t just any piece of furniture; it’s where you’ll handle projects on a regular basis. Basically, the workbench becomes the center of your workspace.
When you’re deciding between a stationary workbench or a rolling one, it’s worth taking some time. That choice can shape how you work and how smoothly things go. Here’s a breakdown to help you figure out what’s right for you.
What Are Rolling and Stationary Workbenches?
Let’s clear up what these two types actually are. A stationary workbench stays right where you put it. Usually, it’s heavy and built to take a beating – moving it isn’t part of the plan. For extra stability, most people set these benches against a wall or even anchor them in place.
Rolling workbenches change things up with casters – sturdy wheels that let you move the whole bench around the shop. They’re perfect if you need to shift your workspace on the fly or want to bring your work surface closer to big tools or projects. You can lock the wheels when you want it to stay put, so you get a mix of mobility and stability. Check heavy-duty rolling workbenches at Dyco Ventures with a range of custom options to choose from.
Key Features Comparison Table
| Feature | Rolling Workbench | Stationary Workbench |
| Mobility | High – easy to move | None – fixed position |
| Stability | Moderate with locking wheels | Excellent |
| Load Capacity | Moderate to high | Very high |
| Space Optimization | Flexible | Limited |
| Cost | Generally higher due to casters | Often more affordable |
| Maintenance | Requires occasional caster upkeep | Minimal maintenance |
Advantages of Rolling Workbenches
Rolling workbenches have become pretty popular in both pro shops and home garages, mostly because they’re so easy to move. That mobility lets you rearrange your workspace on the fly – super useful if you’re tight on space or want to use your garage for more than just projects.
Cleaning’s also a breeze. Since you can wheel the bench out of the way, it’s simple to sweep or mop spots that would otherwise collect junk, dust, or spilled stuff. Plus, a lot of rolling benches come with built-in storage – think drawers, shelves, or even pegboards – so you get more bang for your buck when it comes to staying organized.
Drawbacks of Rolling Workbenches
But there are downsides too. Even if you lock the wheels, rolling benches just aren’t as rock-solid as stationary ones. If you’re doing something that needs a really steady surface – like heavy hammering, metalwork, or detailed woodworking – you’ll probably notice more wobble or vibration than you’d like.
Another thing: rolling workbenches usually cost more. The extra features, like sturdy wheels and good hardware, bump up the price. And don’t forget, you’ll have to keep those wheels in good shape if you want the bench to roll smoothly and safely over time.
Advantages of Stationary Workbenches
Stationary workbenches are a classic pick if you’ve got plenty of room to work with. The main thing they offer is rock-solid stability. They’re built to handle heavy equipment, oversized materials, and tough projects – without budging or wobbling.
Another perk: they can take a lot of weight. Thanks to their thick frames and sturdy build, stationary benches fit right in when you’re dealing with woodworking, metalwork, or car repairs. Since they don’t move around, it’s also easy to wire up outlets, set up tool storage, or hook in dust collection right where you need it.
Drawbacks of Stationary Workbenches
Steady beches aren’t going anywhere once you set them up. If you want to rearrange your space, moving a stationary bench usually means breaking it down – definitely not quick or easy. That makes them a tricky fit for small or shared workshops that need to stay flexible.
They also have a pretty big footprint. Because these benches are often big and heavy, they can eat up precious space. For casual DIYers or people working out of a cramped garage, that can be a real drawback.
Factors to Consider When Choosing
Deciding between a rolling or stationary workbench really comes down to a few key things:
- Space: If you’re working in a cramped spot or need to share the area, a rolling bench gives you some wiggle room. But for bigger workshops that aren’t going anywhere, a fixed bench is hard to beat in terms of sturdiness.
- The Work Itself: Heavy-duty projects want a stationary setup. For lighter tasks or the occasional DIY, a rolling bench does the trick.
- Budget: Usually, rolling benches cost a bit more upfront. If you’re trying to save money, a stationary bench can deliver solid performance for less.
- Down the Line: Think about whether you’ll want to rearrange things later. Rolling benches make that way easier, while stationary ones are meant to stay put.
Expert Tips for Optimal Workbench Setup
Whatever style you go with, there are a few smart ways to upgrade your workbench:
- Tool Storage: Built-in drawers, shelves, or even a simple pegboard can keep your gear tidy and always close by.
- Lighting: Good, bright lighting that you can adjust makes a huge difference – your eyes (and your accuracy) will thank you.
- Surface Material: Pick a tough work surface that fits your projects – hardwood, stainless steel, or laminated plywood are all solid picks, depending on what you’re working with.
- Safety Features: Don’t leave sharp tools out – store them safely. And if you’re on your feet a lot, an anti-fatigue mat really helps.
Maintenance and Longevity
If you take care of your workbench – whether it moves or stays put – you’ll get years of solid use out of it. For rolling benches, check in on the casters now and then (they need a bit of lubrication) and make sure the locking systems still work the way they should. With stationary benches, it’s a good idea to tighten up any loose joints or fasteners, especially if you put them through heavy lifting.
And honestly, just keeping your work surface and storage spaces clean makes a big difference. Wiping away dust, grease, or the occasional rust spot keeps your bench not only usable but also looking good.
Conclusion
There’s no one-size-fits-all here. Rolling benches are hard to beat when it comes to flexibility, while stationary models are built for serious stability and heavy work. It really comes down to what you need, how much room you have, and what kind of projects you tackle. Weigh your priorities, and you’ll end up with a bench that makes your space safer, more enjoyable, and just plain better to work in – year a
-

 TOPIC8 months ago
7 Expert Tips For Choosing The Best Basement Renovation Companies
-

 BUSINESS2 months ago
Top 5 Features of Sowix Online That Every User Should Know About
-

 TOPIC2 weeks ago
Why Greece Katz Martian Has Everyone Talking in 2025
-

 TOPIC1 month ago
Top Features of BetterThisWorld .com You Need to Know About
-

 FINANCE5 months ago
How TraceLoans Can Simplify Your Finances
-

 BIOGRAPHY5 months ago
From Reality Star to Business Mogul: Prince Narula Digital PayPal
-

 EDUCATION1 month ago
The Evolution of Pi123: How It Became a Must-Have Tool
-

 TOPIC2 months ago
Sabsastaa.com: Your Ultimate Guide to Budget Shopping and Savings